How Does a Water Softener Work? Complete Guide
Learn how water softeners use ion exchange to strip hard minerals. Discover mechanics, regeneration, costs, and call 24x7 American Plumber at 762-383-0288.

How Does a Water Softener Actually Work?
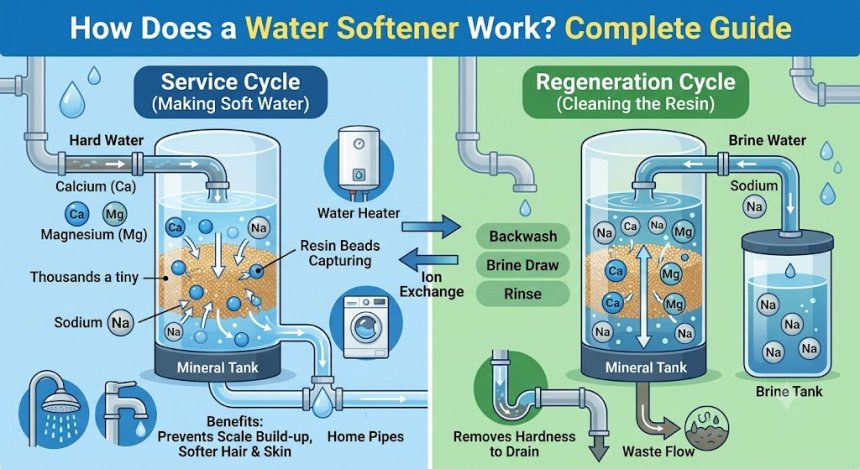
A water softener works through an electrochemical chemical process called ion exchange, passing hard water through a resin bed charged with sodium or potassium ions to capture and extract dissolved calcium ($Ca^{2+}$) and magnesium ($Mg^{2+}$) minerals, preventing limescale buildup across home plumbing fixtures and appliances.
The Chemistry & Physics of Hard Water and Ion Exchange
Hard water contains elevated concentrations of dissolved calcium and magnesium ions leached from underground limestone, chalk, and gypsum deposits. When heated or exposed to pressure drops inside home plumbing, these minerals precipitate out of solution, forming rock-hard calcium carbonate calcification ($CaCO_3$), commonly known as limescale.
          SERVICE CYCLE                           REGENERATION CYCLE
    (Hard Water -> Soft Water)               (Brine Wash -> Flushing Resin)

      Hard Water In ($Ca^{2+}, Mg^{2+}$)           Saturated Brine In ($Na^+$)
             |                                              |
             v                                              v
      +--------------+                               +--------------+
      |  Resin Bed   |                               |  Resin Bed   |
      | ($Na^+$ Charged)                             | ($Ca^{2+}, Mg^{2+}$)
      +--------------+                               +--------------+
             |                                              |
             v (Minerals Swap)                              v (Minerals Dumped)
      Soft Water Out ($Na^+$)                        Brine Discharge to Drain
1. The Ion Exchange Principle
Opposites attract in atomic physics. A standard water softener contains a mineral tank filled with thousands of tiny negatively charged polystyrene resin beads (cross-linked divinylbenzene). During setup or regeneration, these negatively charged resin beads are coated with weakly bonded, positively charged sodium ($Na^+$) or potassium ($K^+$) ions.
When hard water flows through the mineral tank, the positively charged calcium ($Ca^{2+}$) and magnesium ($Mg^{2+}$) ions possess a stronger positive electrical charge than sodium ($Na^+$). As a result, the resin beads act like magnetic traps: they grab and hold onto the heavier calcium and magnesium ions, releasing harmless sodium ions back into the water supply in a 1-to-1 swap.
2. Thermal Expansion & Limescale Acceleration
Limescale formation accelerates dramatically inside water heaters due to retrograde solubility: calcium carbonate becomes less soluble as water temperature increases. Unsoftened water causes rapid mineral buildup on heating elements and heat exchangers, forming an insulating crust. A 1/8-inch layer of limescale crust forces water heaters to consume up to 20% more energy to heat water, leading to premature tank failure.
Anatomical Breakdown: Key System Components
To understand how a softener operates, it helps to identify its primary mechanical components:
                      +-------------------+
                      |   Control Valve   |  <-- Digital Brain / Meter
                      +---------+---------+
                                |
             +------------------+------------------+
             |                                     |
             v                                     v
   +-------------------+                 +-------------------+
   |   Mineral Tank    |                 |    Brine Tank     |
   |                   |  <--Brine Line->|                   |
   |  [ Resin Bed ]    |                 |   [ Salt Pellets] |
   |  [ Gravel Bed ]   |                 |   [ Salt Brine  ] |
   |  [ Riser Tube ]   |                 |   [ Brine Well  ] |
   +-------------------+                 +-------------------+
-
The Control Valve (The Brain): Mounted atop the mineral tank, this digital motor directs water flow during normal service and automatically initiates multi-stage regeneration cycles based on gallon usage or timer intervals.
-
The Mineral (Resin) Tank: The tall inner cylinder where active ion exchange takes place. It houses the resin bed supported by a gravel base layer and an internal riser tube with a bottom distributor basket.
-
The Brine Tank: The adjacent cabinet tank containing water-softening salt (sodium chloride or potassium chloride). It holds a concentrated liquid brine solution used to recharge depleted resin beads during regeneration.
The Four Stages of the Softener Regeneration Cycle
Eventually, every resin bead becomes saturated with calcium and magnesium ions and can no longer trap minerals. The control valve automatically triggers a 4-step regeneration cycle (usually at 2:00 AM) to clean the resin bed:
+-----------------------------------------------------------------+
|  STAGE 1: Backwash (10-15 Mins)                                 |
|  Water flows backward up the riser tube to lift & clean resin. |
+-----------------------------------------------------------------+
                                |
                                v
+-----------------------------------------------------------------+
|  STAGE 2: Brine Draw & Slow Rinse (50-60 Mins)                  |
|  Concentrated salt brine passes through resin, stripping minerals.|
+-----------------------------------------------------------------+
                                |
                                v
+-----------------------------------------------------------------+
|  STAGE 3: Fast Rinse (5-10 Mins)                                |
|  Fresh water flushes remaining brine & hardness to drain line.  |
+-----------------------------------------------------------------+
                                |
                                v
+-----------------------------------------------------------------+
|  STAGE 4: Brine Tank Refill (5-15 Mins)                         |
|  Clean water fills brine tank to dissolve salt for next cycle.  |
+-----------------------------------------------------------------+
-
Backwash Stage: Fresh water flows downward through the riser tube and surges upward through the resin bed, expanding the beads and flushing trapped sediment out to the drain line.
-
Brine Draw Stage: The control valve creates a vacuum siphon (venturi effect) to pull concentrated salt brine from the brine tank into the resin tank. The high concentration of sodium ions overpowers the calcium and magnesium bonds, stripping the hard minerals off the resin and sending them down the drain.
-
Fast Rinse Stage: Clean, fresh water flushes through the mineral tank at high velocity to remove all leftover brine solution and lingering hardness traces.
-
Brine Refill Stage: Fresh water flows back into the brine tank to dissolve salt pellets, creating a new batch of saturated brine for the next scheduled regeneration.
Hidden Pro Tips & Maintenance Secrets from Master Plumbers
-
Evade Salt Bridges: High humidity or overfilling salt tanks can form a hard, hollow crust of salt called a "salt bridge" over the water layer. The softener will appear full of salt, but the water beneath remains unsoftened. Gently break up salt bridges using a broom handle.
-
Use Evaporated Solar Salt: Always buy high-purity solar salt or evaporated salt pellets (99.6% pure) over cheaper rock salt. Rock salt contains insoluble impurities that clog brine valves and create heavy sludge inside the brine tank bottom.
-
Install an Upstream Sediment Pre-Filter: City water mains and well pumps carry fine silt and rust particles that coat resin beads and destroy delicate control valve rotor seals. Installing a 5-micron pre-filter before the softener doubles system life.
-
Annual Resin Bed Cleansing: Iron and manganese gradually foul softening resin over time, reducing efficiency. Pour an iron-out resin cleaner into the brine well once a year to strip iron deposits off the resin beads.
-
Set Hardness Level Accurately: Testing water hardness using grains per gallon (GPG) testing strips allows precise programming of the control head. Over-estimating hardness wastes salt and water, while under-estimating causes hard water breakthrough.
Step-by-Step DIY Diagnostic & Maintenance Guide
Perform this routine inspection sequence every 3 to 6 months to ensure optimum softening performance and prevent brine tank overflows.
+-----------------------------------------------------------------+
|                        SAFETY FIRST                             |
|  Unplug control head power before inspecting electrical parts.  |
|  Verify drain line air-gap complies with local health codes!   |
+-----------------------------------------------------------------+
                                |
                                v
+-----------------------------------------------------------------+
|  STEP 1: Check Salt Level & Salt Bridge                         |
|  Keep salt half-full; probe with broom handle to break crust.   |
+-----------------------------------------------------------------+
                                |
                                v
+-----------------------------------------------------------------+
|  STEP 2: Inspect Brine Well & Float Assembly                    |
|  Check safety float mechanism for salt crystal buildup.         |
+-----------------------------------------------------------------+
                                |
                                v
+-----------------------------------------------------------------+
|  STEP 3: Check Control Valve Programming                        |
|  Verify current time, hardness setting (GPG), & cycle timing.   |
+-----------------------------------------------------------------+
                                |
                                v
+-----------------------------------------------------------------+
|  STEP 4: Manually Trigger Regeneration                          |
|  Hold "Recharge" button to test backwash cycle & drain flow.    |
+-----------------------------------------------------------------+
Safety Warnings
-
Cross-Connection Protection: The backwash drain hose must terminate at least 2 inches above the open drain pipe edge (air-gap fitting). Direct-piping a softener drain into a waste line creates a cross-connection hazard that can siphon raw sewage back into home drinking water lines.
-
Bypass Valve Knowledge: Always locate and test your system’s 3-valve or push-button bypass valve before performing maintenance. Knowing how to engage the bypass allows you to isolate a leaking unit instantly without turning off water to the entire home.
Step-by-Step Instructions
-
Inspect Brine Storage: Open the brine tank lid and check salt levels. Salt levels should remain roughly 3 to 4 inches above the standing water level, kept about half-full.
-
Test for Salt Bridges: Take a wooden broom handle and gently push down into the salt pile until it hits the bottom or encounters a hollow crust. If a hard crust holds the salt up, press firmly to break it up.
-
Inspect Safety Float: Pull the cap off the narrow vertical brine well pipe inside the tank. Verify the safety float moves freely up and down without sticking on salt crystals.
-
Examine Pre-Filter Element: If your system features an upstream sediment filter housing, check the filter cartridge color. Replace it if it appears dark brown or black.
-
Initiate Manual Recharge: Press and hold the "Recharge" or "Regen" button on the digital display for 5 seconds to force a manual regeneration cycle. Confirm that water flows freely out the backwash drain line without leaking at fitting joints.
If your water softener displays error codes, fills the brine tank to the rim without drawing down water, or lets hard water pass despite having plenty of salt, the internal rotor disk, venturi injector, or resin bed may need replacement. Contact
24x7 American Plumber at 762-383-0288 for professional diagnosis.
Safe DIY vs. Requires a Licensed Professional
Knowing what tasks are safe for homeowners versus those requiring licensed plumbing installation prevents code violations and water damage.
| Maintenance Task | Safe for DIY Homeowners | Requires a Licensed Professional |
| Routine Operations | Adding salt pellets, breaking up salt bridges, setting time | Sizing equipment based on home GPG hardness & flow rate |
| System Sanitization | Adding resin bed cleaner or mild bleach during recharge | Replacing resin bed media or rebuilding internal rotor valves |
| Filter Changes | Replacing 10-inch or 20-inch sediment pre-filter cartridges | Installing dedicated loop bypass piping or hard-plumbing line connections |
| Drain Maintenance | Checking drain line air gaps and clearing surface kinking | Modifying main house supply loops or tying into main drain stacks |
Professional Equipment & Industry Cost Context
Commercial water conditioning technicians rely on specialized testing gear and equipment to design and service treatment systems properly.
       HACH HARDNESS TEST KIT                 AIR-GAP DRAIN FITTING

        +------------------+                       [ Discharge Hose ]
        |  [Reagent 1]     |                              ||
        |  [Reagent 2]     |                              ||
        |  [Titration Tube]|                      +-------||-------+
        +------------------+                      |   2" Air-Gap  |
                                                  +-------||-------+
                                                          v
                                                 [ Standpipe Drain ]
How Plumbers Work
-
Digital Titration Testing Kits: Plumbers use liquid drop titration testing (Hach kits) to calculate precise water hardness in GPG (Grains Per Gallon), iron content in PPM (Parts Per Million), and total dissolved solids (TDS) rather than relying on basic paper test strips.
-
Venturi Injector Cleaning & Service: Techs disassemble tiny venturi nozzles inside the main control head to clear mineral scale blocking the suction vacuum needed to pull salt brine into the resin tank.
-
Code-Compliant Air-Gap Fittings: Installers mount specialized air-gap brackets to discharge lines, guaranteeing that backup pressure in waste drains can never contaminate pure water lines.
Realistic Industry Cost & Lifespan Estimates (US Standard)
-
Water Softener System Lifespan: 10 – 15 years (Resin degrades over time due to municipal chlorine)
-
Annual Salt & Maintenance Cost: $100 – $250
-
DIY Replacement Pre-Filter Cartridges: $15 – $40
-
Professional Softener Installation Cost: $1,200 – $3,000 (Depending on grain capacity)
-
Professional Service Call / Maintenance: $150 – $300
When to Call the Pros
While adding salt pellets is straightforward, complex electrical, valve, or plumbing issues require certified water treatment professionals.
Call a Professional Immediately If:
-
Water Softener Standing Water Overflow: The brine tank fills completely with water and fails to drain during regeneration cycles.
-
Resin Beads in Home Faucets: Yellow or orange sand-like resin beads clogging your faucet aerators indicate a ruptured internal distributor basket inside the mineral tank.
-
Sudden Water Pressure Drop: Severe pressure loss across all home fixtures often signals a fouled, compacted resin bed that needs rebedding or replacement.
-
Salty Tasting Tap Water: Water tasting salty after regeneration indicates a failing control valve motor or clogged drain line that fails to flush out excess brine.
-
New Equipment Installation: Installing a new water softener requires cutting into the main incoming water line, running code-compliant bypass loops, and installing proper backwash drain connections.
When your water treatment system needs expert attention, rely on the certified technicians at 24x7 American Plumber.
-
Direct Phone:
762-383-0288 -
Web Services & Scheduling:
24x7americanplumber.com -
Service Scope: 24/7 Emergency Service, Routine Plumbing, & Water Treatment Solutions Nationwide across the USA
Frequently Asked Questions (FAQs)
Q: Does a water softener make tap water unsafe to drink due to sodium?
A: No. A water softener adds a small amount of sodium during ion exchange—roughly 28 milligrams per 8-ounce glass in moderately hard water (10 GPG). This is less sodium than a slice of white bread. However, homeowners on strict low-sodium diets can use potassium chloride pellets instead of sodium chloride.
Q: How often should my water softener regenerate?
A: Modern demand-initiated regeneration softeners calculate usage automatically and regenerate every 3 to 7 days depending on home water consumption and hardness levels. Older timer-based units regenerate on a fixed schedule (e.g., every 3 days at 2:00 AM).
Q: Why is my brine tank filling with water but not using any salt?
A: This issue usually stems from a clogged venturi injector, a blocked drain line, or a stuck brine safety float. When the control valve cannot create a vacuum suction to pull brine into the mineral tank, water remains in the brine tank without being drawn down.
Q: How do I know what size water softener my home needs?
A: System size is calculated in grains of capacity (e.g., 32,000 grain vs 48,000 grain). Multiply the number of people living in your home by 75 gallons per day, then multiply that total by your water hardness in GPG (Grains Per Gallon) to determine your required daily grain capacity.