How to Fix a Dripping Faucet: Cartridge vs. Washer
Fix a leaking faucet fast! Learn the difference between cartridge and washer issues, mechanical steps, costs, and when to call 24x7 American Plumber.

How to Fix a Dripping Faucet Cartridge vs. Washer Issues
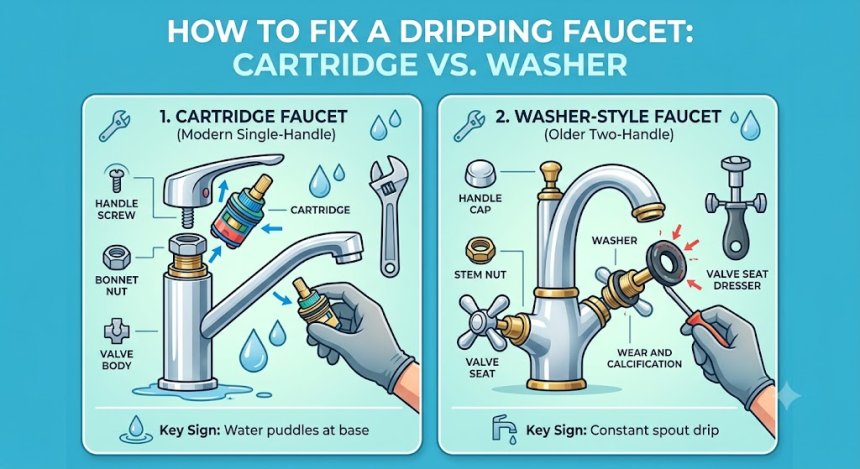
To fix a dripping faucet, shut off the water supply, disassemble the handle, and determine if your fixture uses a compression washer or a stem cartridge: replace worn rubber washers in older compression faucets, or swap out the entire plastic/brass cartridge unit in modern washerless fixtures.
The Physics & Mechanics: Why Faucets Leak
Faucets do not start dripping by accident; leaks are the direct result of continuous hydraulic pressure, mechanical friction, and water quality chemistry acting on seal components over time.
       COMPRESSION FAUCET                     CARTRIDGE FAUCET

         [ Handle ]                             [ Handle ]
             ||                                     ||
      /---------------\                      /---------------\
     | Threaded Stem   |                    | Outer Housing   |
     | (Friction/Wear) |                    | Inner Cartridge |
     |  [O-Ring]       |                    | (Flow Ports)    |
     |  [Rubber Washer]| <-- Degradation    | [O-Ring Seals]  | <-- Calcification
     +-----------------+                    +-----------------+
     | Valve Seat      |                    | Valve Base      |
      \---------------/                      \---------------/
1. Hydraulic Pressure & Water Hammer
Municipal supply lines deliver water to residential fixtures at 40 to 80 pounds per square inch (PSI). When a faucet handle is turned off, this static hydraulic force rests directly against the internal seals. Repeated pressure surges—or elevated static pressure above 80 PSI—accelerate internal seal degradation.
2. Sediment Calcification & Abrasion
Hard water contains dissolved calcium carbonate and magnesium ions. As water trickles past internal valves, mineral deposits crystallize along rubber washers, O-rings, and ceramic cartridges. These sharp, calcified micro-crystals act like sandpaper on seals every time the handle rotates.
3. Galvanic Corrosion & Thermal Expansion
Mixing brass stems, copper body housings, and stainless steel screws creates low-level galvanic corrosion over time. Combined with hot water causing repeated thermal expansion and contraction of rubber seals, internal components lose elasticity, leading to persistent leaks at the spout or handle base.
Cartridge vs. Compression Washer Faucets: Side-by-Side Comparison
| Feature | Washer-Based (Compression) Faucet | Cartridge Faucet |
| Common Fixture Type | Older, two-handle traditional sinks | Modern single-handle or two-handle fixtures |
| Sealing Mechanism | Rubber washer pressed down over a metal valve seat | Brass or plastic cartridge with internal aligned ports |
| Primary Point of Failure | Dried, cracked, or deformed rubber bottom washer | Damaged O-rings, internal score marks, or calcification |
| Repair Complexity | Low to Moderate (Requires checking valve seat) | Moderate (Requires specific replacement cartridge model) |
| Average Component Cost | $2 – $8 per repair kit | $15 – $45 per replacement cartridge |
| Typical Lifespan | 3 – 5 years before washer replacement | 8 – 12 years before cartridge replacement |
Deep Dive: Washer-Based (Compression) Faucets
Compression faucets are traditional two-handle fixtures that use a threaded stem to push a thick rubber washer down against a metallic valve seat.
Primary Causes of Failure
-
Flattened or Cracked Washers: Constant mechanical force eventually crushes the rubber washer, creating channels for pressurized water to escape through the spout.
-
Corroded Valve Seats: If a worn washer is not replaced promptly, the metal stem rubs directly against the brass valve seat, creating rough grooves that leak even with a fresh washer installed.
Deep Dive: Cartridge Faucets
Cartridge faucets use an internal brass or plastic cylinder containing precision-aligned holes and ceramic disks to control water flow and mixture.
Primary Causes of Failure
-
Scratched Internal Disks: Fine sand, sediment, or scale particles trapped between the rotating cartridge plates scratch the smooth ceramic surface, breaking the watertight seal.
-
Degraded O-Rings: Outer rubber O-rings that seal the cartridge inside the brass faucet body wear down, causing water to pool around the base of the handle when turned on.
Hidden Pro Tips & Secrets from Master Plumbers
-
The Index Card Model Search: Faucet cartridges are non-standardized across brands (Moen, Delta, Kohler, American Standard). Before heading to the hardware store, slide the old cartridge through a piece of cardstock, trace its outline, and bring both the old part and tracing to ensure a exact match.
-
Always Dress the Valve Seat: On compression faucets, replacing the washer without smoothing the brass valve seat below it usually results in a leak within weeks. Use an inexpensive seat dresser tool to ground out rough pitting before installing new rubber.
-
Silicon Grease Application: Apply food-grade silicone plumber's grease to all new rubber O-rings and cartridge casings before installation. Never use petroleum jelly (Vaseline), as petroleum accelerates natural rubber degradation.
-
Flush Supply Lines Before Reassembly: Before inserting a new cartridge, hold a cup over the open valve body and briefly turn on the water shutoff under the sink. This flushes loose mineral scale out of the supply pipe so it won't scratch your brand-new cartridge.
-
Duct Tape the Plier Jaws: Wrap masking or duct tape around smooth wrench jaws before gripping decorative finish nuts or handle caps to prevent scratching chrome, nickel, or matte black finishes.
Step-by-Step DIY Repair Guide
Follow this logical sequence to diagnose and fix a dripping faucet safely without causing household water damage.
+-----------------------------------------------------------------+
|                        SAFETY FIRST                             |
|  Shut off under-sink water valves & cover drain opening!        |
+-----------------------------------------------------------------+
                                |
                                v
+-----------------------------------------------------------------+
|  STEP 1: Disassemble Handle                                     |
|  Remove decorative cap, unscrew handle, and slide off spout.    |
+-----------------------------------------------------------------+
                                |
                                v
+-----------------------------------------------------------------+
|  STEP 2: Remove Cartridge or Stem                               |
|  Unscrew retaining nut and lift out stem using cartridge puller.|
+-----------------------------------------------------------------+
                                |
                                v
+-----------------------------------------------------------------+
|  STEP 3: Inspect & Replace Components                           |
|  Replace washer/seat OR insert exact matching cartridge model.   |
+-----------------------------------------------------------------+
                                |
                                v
+-----------------------------------------------------------------+
|  STEP 4: Lubricate & Reassemble                                 |
|  Apply silicone grease, tighten retaining nut, reattach handle. |
+-----------------------------------------------------------------+
                                |
                                v
+-----------------------------------------------------------------+
|  STEP 5: Flush & Pressure Test                                  |
|  Remove aerator, turn on supply slowly, check for leaks.        |
+-----------------------------------------------------------------+
Safety Warnings
-
Shut Off Water First: Always close the isolation shut-off valves under the sink (or main home valve) and open the faucet handle to bleed remaining pressure before using wrenches on fixture bodies.
-
Block the Drain: Place a clean rag or sink stopper over the drain opening before taking anything apart to prevent tiny screws and brass clips from falling down the P-trap.
Step-by-Step Instructions
-
Isolate Water Supply: Turn under-sink angle stops clockwise until hand-tight. Turn on the faucet handles to release trapped water pressure.
-
Expose the Stem: Pry off the decorative handle button (H or C) using a flathead screwdriver, remove the exposed handle screw, and pull the handle straight off the stem.
-
Remove Retaining Nut: Use an adjustable wrench to loosen the chrome retaining nut or brass bonnet nut holding the cartridge or stem in place.
-
Extract Stem Component:
-
For Washer Stems: Unscrew the stem completely from the housing. Unscrew the small bottom screw holding the flat rubber washer, and inspect the valve seat inside the faucet body.
-
For Cartridge Units: Pull the cartridge straight up using pliers or a specialized cartridge puller tool. Remove any rubber springs/seats resting inside the lower housing.
-
-
Install New Parts: Coat fresh O-rings and cartridges with food-grade silicone grease and insert them smoothly into the valve body, aligning all tabs with housing notches.
-
Reassemble & Test: Re-tighten bonnet nuts, reattach handles, remove the spout aerator screen, and slowly turn the main water supply back on to flush air from the line before restoring normal use.
If you encounter corroded, frozen bonnet nuts, stripped brass stems, or damaged concealed piping inside the wall, stop before forcing the fixture. Contact
24x7 American Plumber at 762-383-0288 for professional repair assistance.
Safe DIY vs. Requires a Licensed Professional
Knowing when to perform a quick repair versus calling an expert protects your plumbing infrastructure and home insurance coverage.
| Task Category | Safe for DIY Homeowners | Requires a Licensed Professional |
| Faucet Repairs | Replacing worn rubber washers, O-rings, and drop-in cartridges | Repairing broken concealed wall valves or wall-mounted tub/shower manifolds |
| Supply Lines | Swapping flexible braided supply hoses under open vanity sinks | Replacing rusted shut-off valves (angle stops) connected to main supply lines |
| Water Pressure | Adjusting aerators or cleaning mineral buildup on showerheads | Installing/adjusting home Pressure Reducing Valves (PRV) for high static water pressure |
| Pipe Work | Tightening loose external compression fittings or slip joints | Soldering copper joints, work inside finished walls, or main line repiping |
Professional Equipment & Industry Cost Context
Professional plumbers use specialized tools and commercial methods to address stubborn leaks, frozen components, and underlying water quality issues.
      CARTRIDGE PULLER TOOL                    PRESSURE TEST GAUGE

        +---+---[ T-Handle ]                      +------------+
        |   |                                     |    P.S.I.  |
        |   | (Threaded Rod)                      |   [  60  ] |
      +=+=+=+=+                                   |   /    \   |
      |       | (Expanding Jaws Grip             +-----\/-----+
      +-------+  Cartridge Core)                        ||
                                                        || (Fits Hose Thread)
How Plumbers Work
-
Cartridge Extraction Tools: Specialized mechanical pullers lock onto seized plastic or brass cartridge stems, extracting stuck units safely without snapping valve housings hidden behind drywall.
-
Valve Seat Grinders & Cutters: Precision cutting tools resurface or remove pitted internal valve seats on vintage fixtures, restoring a smooth brass surface.
-
Hydrostatic Pressure Gauges: Plumbers thread pressure gauges onto hose bibbs to verify home static water pressure (should be between 40 and 70 PSI) to rule out PRV failure as the root cause of repeated seal blowout.
Realistic Industry Cost & Lifespan Estimates (US Standard)
-
DIY Washer/Cartridge Replacement Cost: $5 – $45 (Parts only)
-
Professional Faucet Repair (Labor & Parts): $150 – $300
-
Complete Faucet Replacement Service: $250 – $550+ (Includes professional fixture assembly)
-
Standard Faucet Lifespan: 10 – 15 years
-
Under-Sink Angle Shut-Off Valve Lifespan: 10 – 15 years (Neoprene internal seals)
When to Call the Pros
While replacing a washer or drop-in cartridge is often an approachable weekend project, complex issues require the tools and expertise of a master plumber.
Call a Professional Immediately If:
-
Seized or Frozen Retaining Nuts: Forcing corroded brass retention nuts can snap internal copper water lines behind the wall, causing major hidden water leaks.
-
Leaking Below the Sink Cabinet: Water pooling inside cabinet bases often stems from failed shut-off valves or compromised supply line connections, not just the spout aerator.
-
High Home Water Pressure: If multiple faucets across your home begin dripping simultaneously, your main pressure regulator may have failed, exposing pipes to damaging hydraulic spikes.
-
Corroded In-Wall Fixtures: Single-handle tub/shower valves set inside tiled walls require specialized soldering or press-fitting tools to replace safely.
When DIY repairs become complex, rely on the certified technicians at 24x7 American Plumber for dependable, clean, and warrantied service.
-
Direct Phone:
762-383-0288 -
Web Services & Scheduling:
24x7americanplumber.com -
Service Scope: 24/7 Emergency Response & General Plumbing Maintenance Nationwide across the USA
Frequently Asked Questions (FAQs)
Q: How do I know if my dripping faucet needs a new washer or a new cartridge?
A: If your faucet has separate hot and cold handles that rotate 360 degrees to tighten down, it typically uses washers (compression faucet). If it has a single lever controlling temperature or handles that stop after a quarter-turn, it utilizes a cartridge or ceramic disk mechanism.
Q: Why is my faucet still dripping after replacing the cartridge?
A: Continued dripping usually indicates debris trapped inside the valve body, damaged rubber seat springs below the cartridge, a crack in the valve housing itself, or unaddressed home static water pressure exceeding 80 PSI.
Q: Can I just tighten the faucet handle to stop a slow drip?
A: No. Over-tightening handles on compression faucets crushes the rubber washer further, destroying it and potentially scoring the brass valve seat below. On cartridge faucets, over-tightening places unnecessary stress on decorative trim without stopping internal leaks.
Q: How long should a replacement faucet cartridge last?
A: A quality OEM replacement cartridge typically lasts 8 to 12 years under normal municipal water conditions. However, high water hardness (above 120 PPM) or heavy sediment lines can reduce cartridge life to 3 to 5 years.