
How to Test Your Sump Pump Before Heavy Rain
Test your sump pump before heavy rain hits! Learn the bucket test, float switch checks, cost estimates, and call 24x7 American Plumber at 762-383-0288.

How to Test Your Sump Pump Before Heavy Rain
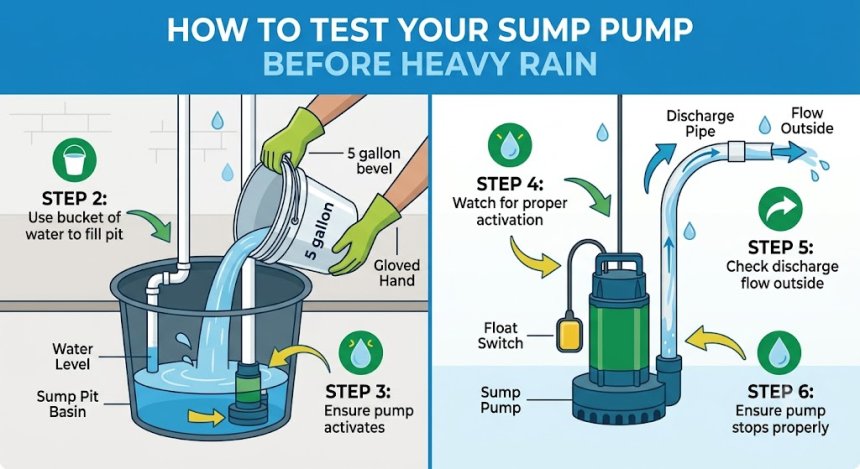
To test your sump pump before heavy rain, clean debris from the pit, ensure the unit is plugged into a dedicated GFCI outlet, and pour 5 gallons of water into the basin until the float switch activates, engages the motor, evacuates the water through the discharge line, and shuts off smoothly.
The Physics & Mechanics: How Sump Pumps Protect Foundations
A sump pump operates on basic principles of fluid dynamics, gravity, and head pressure to prevent basement water intrusion and foundation collapse.
                         TYPICAL SUMP PUMP SYSTEM

                         [ Discharge Pipe ]
                                 ||
                         +-------||-------+
                         | Check Valve    |  <-- Prevents Backflow
                         +-------||-------+
                                 ||
  +------------------------------||------------------------------+
  | Basement Floor               ||                              |
  +------------------------------||------------------------------+
                                 ||
          +----------------------||----------------------+
          | Sump Pit / Basin     ||                      |
          |                      ||                      |
          |               +--------------+               |
          |               | Vertical     |               |
          |               | Float Switch |               |
          |               +-------+------+               |
          |                       |                      |
          |               +-------v------+               |
          |  [Water] ---> | Submersible  |               |
          |  (Groundwater)| Pump Unit    |               |
          +---------------+--------------+---------------+
1. Hydrostatic Pressure & Groundwater Accumulation
During severe rainstorms, soil surrounding your foundation becomes saturated. Water exerts intense hydrostatic pressure against subterranean concrete walls and slab floors. Without a perimeter drain tile system routing this groundwater into a sump basin, this relentless hydraulic force creates hairline cracks, leading to slab heaving and structural basement flooding.
2. Centrifugal Force & Hydraulic Head
When water levels rise inside the basin, a mechanical or electronic float switch triggers the motor. The motor turns an internal impeller at high speeds, using centrifugal force to throw water outward toward the discharge volute. This mechanical energy converts into kinetic energy, overcoming total dynamic head (the vertical elevation lift plus pipe friction) to force water upward and out away from your home's foundation perimeter.
3. Siphonage & Backflow Dynamics
When the pump shuts off, gravity pulls water remaining in the vertical discharge line back down toward the pump. Without an operational check valve (a one-way flap valve), this returning column of water creates back-siphonage, forcing the pump to re-cycle repeatedly (rapid cycling), which burns out the motor windings prematurely.
Sump Pump Types & Float Switch Options
| Feature | Submersible Sump Pump | Pedestal Sump Pump |
| Design | Motor and impeller sealed in a waterproof casing at the bottom of the pit | Motor mounted on a column above the pit; impeller at the bottom |
| Cooling Method | Cooled by surrounding basin water | Cooled by ambient room air |
| Noise Level | Very quiet (submerged under water) | Loud (motor exposed above floor level) |
| Lifespan | 7 – 10 years | 10 – 15 years |
| Float Switch Types | Tethered Float, Vertical Float, or Electronic Probe | Mechanical Rod & Ball Float |
Deep Dive: Critical System Components
1. The Float Switch Mechanism
The float switch is the most common point of failure in any sump system.
-
Tethered Floats: A hollow plastic float attached by a flexible cord. As water rises, the float swings upward and tips a metallic bearing to close the electrical circuit. Tethered floats require wide basins so they don't catch on the pit wall.
-
Vertical Floats: A plastic ring sliding up and down a fixed vertical rod. Ideal for narrow sump basins, vertical floats offer high reliability with minimal risk of mechanical hang-ups.
2. The Check Valve
Located on the PVC discharge pipe above the basin, this valve uses a spring-loaded or swing flap to allow water to travel outward while preventing thousands of gallons from rushing backward into the basin when the pump cycles off.
Hidden Pro Tips & Secrets from Master Plumbers
-
Drill a Weep Hole (Anti-Air Lock Hole): Submersible pumps can trap an pocket of air inside the impeller housing after dry periods. Drill a 3/16-inch hole in the PVC pipe between the pump discharge outlet and the check valve at a 45-degree angle downward into the pit. This allows trapped air to vent so the pump doesn't spin uselessly during a flash storm.
-
The Dual-Plug Piggyback Trick: Most pumps feature a "piggyback" float switch plug. The float switch plugs directly into the wall outlet, and the pump motor plugs into the back of the float switch plug. To test if a dead pump has a broken float or a burnt motor, unplug the motor from the back of the float plug and plug it directly into the wall. If it runs, only the switch needs replacement.
-
Dedicated Circuit Requirement: Never plug a sump pump into an extension cord or a shared living area circuit. The high initial current draw (locked rotor amp surge) can trip shared breakers, leaving your basement vulnerable during night storms.
-
Clean the Impeller Volute: Silt, tiny gravel pieces, and sump liner debris collect at the bottom of the basin. Periodically lift the pump out and clear the bottom intake screen to prevent clogged impellers.
-
Inspect the Exterior Discharge Point: A perfectly working pump is useless if the exterior discharge pipe is clogged with leaves, frozen with ice, or draining directly against your home's foundation wall. Ensure discharge lines extend at least 10 feet away from foundation grading.
Step-by-Step DIY Diagnostic & Bucket Test Guide
Perform this complete diagnostic test at least twice a year—once in early spring and once before late autumn rain cycles.
+-----------------------------------------------------------------+
|                        SAFETY FIRST                             |
|  Unplug unit before putting hands inside the pit!               |
|  Never touch electrical plugs while standing in damp water.     |
+-----------------------------------------------------------------+
                                |
                                v
+-----------------------------------------------------------------+
|  STEP 1: Visual Inspection & Debris Clearance                   |
|  Remove pit lid, inspect for mud/gravel, ensure pump sits level.|
+-----------------------------------------------------------------+
                                |
                                v
+-----------------------------------------------------------------+
|  STEP 2: Power & Electrical Verification                        |
|  Verify GFCI outlet operation & perform direct motor test.      |
+-----------------------------------------------------------------+
                                |
                                v
+-----------------------------------------------------------------+
|  STEP 3: The 5-Gallon Bucket Test                               |
|  Pour 5 gallons of water into basin to test float activation.   |
+-----------------------------------------------------------------+
                                |
                                v
+-----------------------------------------------------------------+
|  STEP 4: Verify Check Valve & Evacuation                        |
|  Ensure water evacuates quickly without backflow clunking.      |
+-----------------------------------------------------------------+
                                |
                                v
+-----------------------------------------------------------------+
|  STEP 5: Check Exterior Discharge Outlet                        |
|  Confirm water flows freely 10+ feet away from foundation.      |
+-----------------------------------------------------------------+
Safety Warnings
-
Electrical Hazard: Always verify your outlet is a tested Ground Fault Circuit Interrupter (GFCI). Never bypass ground prongs or run lightweight extension cords to a sump pump.
-
Biological Hazard: Sump pits accumulate stagnant groundwater, mold spores, and radon gas. Wear rubber gloves and ensure adequate ventilation when working inside deep sumps.
Step-by-Step Instructions
-
Inspect the Pit: Remove the sump basin cover. Clear out any accumulated mud, rocks, or debris that could jam the float switch or intake screen. Ensure the pump rests on a flat, solid brick or raised pedestal base—never sitting directly in loose gravel.
-
Check the Float Path: Manually lift the float switch up and down with your hand to ensure it moves freely without scraping against the basin wall, discharge pipe, or power cord.
-
Verify Power Source: Plug a lamp or small tester into the GFCI outlet to confirm power is present. Test and reset the GFCI button.
-
Conduct the 5-Gallon Bucket Test: Slowly pour a 5-gallon bucket of clean water directly into the sump pit.
-
Observe the Activation: Watch as the water level rises. The float should rise smoothly, activate the motor switch, empty the basin within 10 to 15 seconds, and shut off clean before running dry.
-
Check for Backflow: Watch the vertical check valve as the motor shuts off. Listen for a smooth closure. If water surges back into the pit and forces the pump to turn right back on, replace the check valve immediately.
If your pump hums without pumping water, fails to turn on during the bucket test, or trips your home breaker repeatedly, do not wait for rain. Contact
24x7 American Plumber at 762-383-0288 for rapid, professional sump pump maintenance or replacement.
Safe DIY vs. Requires a Licensed Professional
Knowing your limits prevents accidental basement flooding and electrical hazards.
| Task Category | Safe for DIY Homeowners | Requires a Licensed Professional |
| Basic Maintenance | Cleaning pit debris, conducting bucket tests, clearing intake screens | Hard-wiring battery backup systems or installing dual-pump manifolds |
| Simple Repairs | Swapping external check valves or piggyback float switches | Replacing faulty GFCI outlets or running new dedicated electrical lines |
| Discharge Lines | Inspecting exterior discharge nozzles for leaf/ice blockages | Excavating buried exterior drainage lines or installing underground bubbler pots |
| Full Replacements | Swapping direct plug-and-play submersible units | Cutting slab concrete to enlarge basins or installing primary perimeter drain tile |
Professional Equipment & Industry Cost Context
Professional plumbers use heavy-duty commercial equipment to safeguard basements against catastrophic power losses and storm surges.
       DC BATTERY BACKUP SYSTEM               HEAVY-DUTY SILENT CHECK VALVE

        +-------------------+                      +-------------------+
        |  Control Charger  |                      | [ Clear PVC Body] |
        +---------+---------+                      | [ Spring Valve  ] | <-- Eliminates
                  |                                | [ Rubber Couplers]|     Water Hammer
        +---------v---------+                      +--------||---------+     Thump
        | Deep-Cycle Battery|                               ||
        +-------------------+                      [ Discharge Line ]
How Plumbers Work
-
Dual-Pump Battery Backup Systems: Certified plumbers install secondary DC-powered backup pumps alongside primary AC units. If storm winds knock out utility power or the primary motor fails, an automated float triggers the battery backup pump, providing up to 48 hours of continuous pumping protection.
-
Silent Check Valves: Standard spring-loaded check valves slam shut with a loud clunking noise (water hammer). Master plumbers install clear-bodied silent check valves with soft-closing spring mechanisms that eliminate pipe chatter and hydraulic shock.
-
High-Flow Submersible Pumps: Professionals install cast-iron housing pumps equipped with thermal overload protection and vortex impellers capable of passing 1/2-inch solids at 4,000+ Gallons Per Hour (GPM).
Realistic Industry Cost & Lifespan Estimates (US Standard)
-
Primary Submersible Pump Lifespan: 7 – 10 years (Cost: $150 – $350 unit only)
-
Deep-Cycle Backup Battery Lifespan: 3 – 5 years (Cost: $150 – $250)
-
Professional Primary Sump Pump Replacement: $450 – $850 (Labor & parts)
-
Complete Combination System (Primary + Battery Backup Installed): $1,200 – $2,500
-
Emergency Water Extraction/Basement Cleanup Service: $1,500 – $5,000+
When to Call the Pros
When severe weather approaches, an unreliable sump pump is a major financial risk. Call a professional if you notice critical warning signs.
Call a Professional Immediately If:
-
The Pump Hums But Won't Run: A buzzing motor indicates a jammed impeller, a failed capacitor, or a seized shaft that can burn out in minutes.
-
Continuous Running: A pump that won't shut off will overheat and burn out quickly. This points to a stuck float switch, a missing check valve, or an undersized pump.
-
Excessive Noise or Vibration: Loud grinding or rattling sounds indicate bent impeller blades, worn motor bearings, or loose mounting hardware.
-
No Battery Backup Protection: If your area experiences frequent power outages during heavy storms, operating a single AC-powered pump leaves your home completely unprotected.
-
Aging Equipment (>7 Years Old): Sump pumps fail without warning. If your unit is approaching a decade of service, proactive replacement is significantly cheaper than restoring a flooded basement.
Protect your home's foundation and finished basement spaces with certified plumbing expertise. Contact 24x7 American Plumber for complete sump pump inspections, battery backup installations, and 24/7 emergency response.
-
Direct Phone:
762-383-0288 -
Web Services & Scheduling:
24x7americanplumber.com -
Service Scope: 24/7 Emergency Service & Flood Prevention Solutions Nationwide across the USA
Frequently Asked Questions (FAQs)
Q: How much water should I pour into my sump basin to test the pump properly?
A: Pour approximately 4 to 5 gallons of water into the sump basin slowly. This provides enough volume to raise the float switch naturally, trigger the motor, test the evacuation rate through the discharge pipe, and verify that the switch shuts off before running dry.
Q: Why does my sump pump turn on and off every few seconds during a storm?
A: Rapid cycling is usually caused by a missing or broken check valve, allowing discharged water to fall right back into the pit. It can also occur if the float switch is set too low or if the basin is too small for the volume of water entering the pit.
Q: Will my sump pump work if the power goes out during a heavy thunderstorm?
A: No. Standard primary sump pumps run on 120V household AC power. If the power cuts out during a storm, your pump will stop working completely unless you have installed an auxiliary battery-backup pump system or a whole-home standby generator.
Q: Why is my sump pump making a loud clunking noise every time it stops pumping?
A: The loud thud or clunking sound occurs when water in the vertical discharge pipe falls back down against a standard check valve, causing hydraulic water hammer. Replacing your standard valve with a spring-loaded "silent check valve" eliminates this noise completely.