How to Flush & Drain a Water Heater: DIY Guide
Learn how to flush and drain a water heater step-by-step. Clear sediment, improve efficiency, and prevent tank damage with our expert DIY guide

How to Flush and Drain a Water Heater Step-by-Step
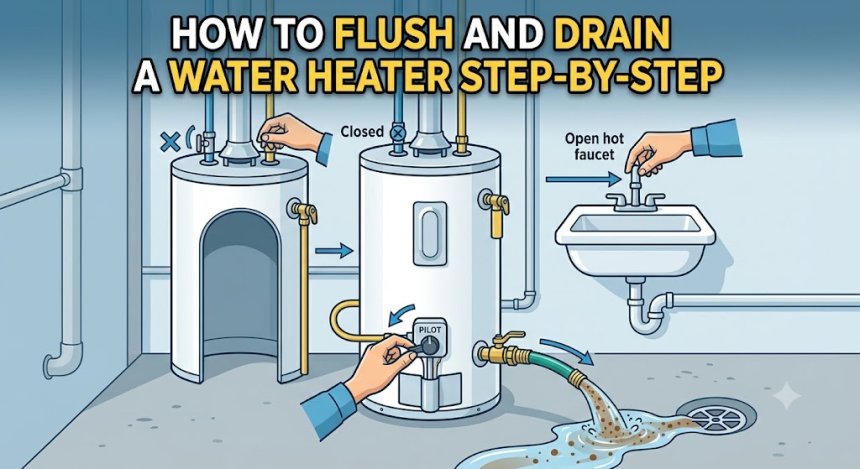
To flush and drain a water heater, turn off the power or gas supply, shut off the cold water inlet valve, attach a hose to the drain valve, and open a nearby hot water faucet to relieve vacuum pressure before draining the sediment-laden tank completely.
The Physics of Sediment: Why Flushing Your Tank Is Essential
Understanding why water heaters require annual flushing comes down to water chemistry and thermodynamics.
┌─────────────────────────────────────────────────────────────────┐
|                  THERMAL PRECIPITATION CYCLE                    |
├─────────────────────────────────────────────────────────────────┤
| 1. Hard Water Entry ──> Cold water brings dissolved Ca2+ & Mg2+ |
| 2. Thermal Heating ──> Water passes 120°F; minerals solidify    |
| 3. Gravity Sinking ──> Heavy calcified scale settles at bottom  |
| 4. Thermal Barrier ──> Sediment insulates heat from water tank  |
1. Thermal Precipitation and Calcification
Municipal and well water supplies in the United States contain dissolved minerals—primarily calcium carbonate and magnesium. As water is heated beyond 120°F, its ability to hold these minerals in solution drops sharply. Minerals precipitate out as solid micro-crystals, forming a chalky, cement-like sediment layer at the tank's base.
2. The Insulative Thermal Blanket Effect
In gas water heaters, the burner fires directly against the bottom head of the steel tank. In electric units, the lower heating element is submerged near the bottom. When a heavy sediment layer sits over these heat transfer surfaces, it acts as a thermal insulator. The burner or heating element must run significantly longer to heat the water above the sediment shield.
3. Galvanic Acceleration and Tank Degradation
Excessive heat trapped under calcified scale degrades the interior porcelain enamel (glass lining) of the tank. As the steel expands unevenly under intense thermal stress, the glass cracks, exposing bare steel to water. This accelerates galvanic corrosion, consuming the sacrificial anode rod prematurely and leading to catastrophic tank failure.
DIY Safety vs. Professional Plumbing Service Scope
Flushing a water heater is a manageable task for most homeowners, but certain conditions require specialized tools and professional intervention to avoid water damage or code violations.
| Task / Condition | Safe for DIY? | Requires a Licensed Professional |
| Annual Preventative Flush (Light Sediment) | Yes | Optional |
| Replacing a Leaky Plastic Drain Valve with Brass | Moderate | Recommended |
| Clearing Heavy, Compacted Sediment (Blocked Drain Valve) | No | Yes |
| Flushing a Tank Over 10 Years Old (Never Flushed) | No | Yes |
| Gas Control Valve or Pilot Assembly Servicing | No | Yes |
| Temperature and Pressure (T&P) Relief Valve Replacement | No | Yes |
| Anode Rod Replacement & Internal Tank Inspection | Moderate | Recommended |
Pre-Maintenance Inspection & Safety Checklist
Before connecting any hoses, perform this quick 3-minute diagnostic check to ensure your safety:
-
Inspect the T&P Relief Valve: Locate the safety valve near the top or upper side of the tank. Check for signs of active leaking or corrosion around the discharge pipe.
-
Locate the Main Shut-off Valve: Ensure the cold water inlet valve above the heater turns smoothly. If it is stuck or corroded, do not force it.
-
Clear the Work Area: Maintain at least 3 feet of clearance around the heater. Ensure a clear pathway to an exterior drain, driveway, or floor drain.
Step-by-Step DIY Guide: Flushing and Draining Your Water Heater
Follow these numbered instructions to safely flush loose sediment from your tank-style water heater.
       WATER HEATER FLUSHING PROCEDURE
       ───────────────────────────────
       [Step 1: Shut Off Power/Gas]
                      │
                      ▼
       [Step 2: Close Cold Water Valve]
                      │
                      ▼
       [Step 3: Attach Garden Hose]
                      │
                      ▼
       [Step 4: Open Hot Faucet & Drain Valve]
                      │
                      ▼
       [Step 5: Flush Clear & Refill Tank]
Required Tools & Materials:
-
Heavy-duty garden hose (3/4-inch diameter preferred)
-
Flathead screwdriver or channel-lock pliers
-
Work gloves and safety glasses
-
Bucket or catch basin
-
Whole-home water pressure gauge (optional)
Step 1: Disconnect the Energy Source
-
Electric Models: Switch off the double-pole circuit breaker labeled "Water Heater" in your main electrical panel. Never drain an electric water heater with power connected; dry-firing will burn out the heating elements in seconds.
-
Gas Models: Turn the gas control knob on the front of the tank from "ON" to "PILOT" (or "OFF").
Step 2: Shut Off the Cold Water Supply
Turn the cold water supply valve (located on the pipe feeding into the top of the heater) clockwise until completely closed.
Step 3: Connect the Drain Hose
Attach a heavy-duty garden hose to the drain valve at the base of the water heater. Route the opposite end of the hose to a floor drain, utility sink, or outside driveway. Keep the hose as level as possible to maximize gravity flow.
Step 4: Relieve Tank Pressure
Open a hot water faucet on the floor above your water heater (e.g., a bathroom sink). This introduces air into the plumbing system, breaking the vacuum seal and allowing water to drain smoothly from the bottom valve.
Step 5: Open the Drain Valve
Carefully turn the drain valve stem counterclockwise using a flathead screwdriver or pliers.
Safety Warning: Water flowing from the hose will be scalding hot (120°F–140°F). Keep pets and children away from the discharge area.
Step 6: Perform the Clear-Water Flush
Once the tank has drained completely, open the cold water supply valve on top of the tank for 30-second bursts while the drain valve remains open. This sudden surge of water agitates remaining bottom sediment and forces it out through the hose. Repeat until the discharge water runs crystal clear.
Step 7: Close Drain and Refill the Tank
-
Close the bottom drain valve and disconnect the hose.
-
Turn the cold water supply valve back on fully to refill the tank.
-
Keep the upstairs hot water faucet open until a steady stream of water flows without sputtering air, then turn it off.
-
Restore Power/Gas: Switch the electrical breaker back ON or return the gas dial to "ON."
Encountered a clogged drain valve or leaking pipe during maintenance? Don't risk flooding your basement. Contact the licensed experts at 24x7 American Plumber at
762-383-0288 for fast, professional assistance.
Plumber Work: How Master Plumbers Clear Heavy Sediment
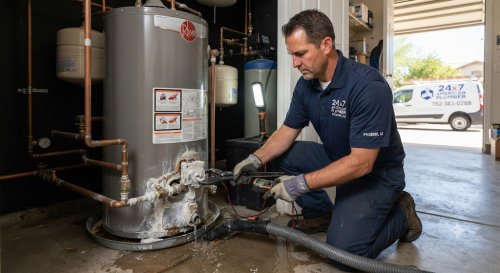
When a water heater hasn't been flushed in several years, the mineral buildup hardens into a thick, rock-like crust at the bottom of the tank. Standard DIY draining will fail because sediment immediately clogs the narrow factory plastic drain valve.
┌─────────────────────────────────────────────────────────────────┐
|                  PROFESSIONAL DESCALING WORKFLOW                |
├─────────────────────────────────────────────────────────────────┤
| 1. High-Flow Valve Upgrade: Remove standard plastic valve;       |
|    install a full-port 3/4" brass ball valve.                   |
|                                                                 |
| 2. Mechanical Agitation: Use flexible probes to break up        |
|    solidified calcium slabs safely without puncturing lining.   |
|                                                                 |
| 3. Hydro-Jet & Vacuum Extraction: Force high-pressure water    |
|    streams to break down scale and extract slurry.              |
|                                                                 |
| 4. Thermal Inspection: Use infrared probes to verify full       |
|    heat transfer efficiency across lower tank walls.            |
└─────────────────────────────────────────────────────────────────┘
Pro "Hidden Tips" for Long-Term Water Heater Protection
-
Upgrade to a Full-Port Brass Drain Valve: Factory-installed plastic drain valves are notoriously narrow and become brittle over time. Replacing them with a 3/4-inch full-port brass ball valve doubles flow capacity and allows calcified chunks to pass easily.
-
Install a Powered Anode Rod: If your water heater produces a "rotten egg" hydrogen sulfide smell, traditional sacrificial aluminum/magnesium rods are reacting with bacteria. Replacing them with a powered titanium anode rod stops smells instantly and extends tank life indefinitely.
-
Check Thermal Expansion Pressure: When water heats, it expands. If your home has a closed plumbing system (check valve or pressure reducing valve), thermal expansion can spike tank pressure up to 150 PSI. Ensure your thermal expansion tank is pre-charged to match your home's static water pressure.
Industry Cost Estimates and Equipment Lifespan
| Service / Equipment Type | Average Industry Cost (US) | Expected Lifespan |
| Professional Water Heater Maintenance & Flush | $150 – $300 | Performed Annually |
| Brass Drain Valve & Anode Rod Replacement | $250 – $450 | Extends life by 3–5 yrs |
| Standard Tank-Style Water Heater (Gas/Electric) | $1,200 – $2,800 | 8 – 12 Years |
| Tankless Water Heater Installation | $2,500 – $4,500+ | 15 – 20+ Years |
When to Call the Pros
While routine flushing is a basic home maintenance task, you should cease DIY efforts and call a licensed plumber immediately if you encounter any of the following critical conditions:
-
The Drain Valve Will Not Open or Is Leaking: Forcing a stuck, aged valve can snap the stem, causing an uncontrolled scalding leak.
-
No Water Flowing Out (Solid Sediment Blockage): Attempting to clear heavy blockages without professional extraction tools can damage the internal tank structure.
-
Visible Rust on the Tank Exterior or Seams: Once rust breaks through the outer jacket, internal tank failure is imminent.
-
Sputtering Hot Water with Flakes or Discoloration: Indicates internal glass lining degradation or complete sacrificial anode depletion.
Need professional water heater maintenance or a emergency replacement? Don't wait for a leak to ruin your home. Contact 24x7 American Plumber today.
Frequently Asked Questions
How often should I flush my water heater?
You should flush your tank-style water heater at least once every 12 months. However, if you live in an area with high water hardness (above 7 grains per gallon), perform a flush every 6 months to prevent scale calcification.
Why is no water coming out when I open the drain valve?
If no water flows out after opening the valve and a hot water faucet, heavy sediment has settled over the inside opening of the drain valve. Shut the system down and contact a professional plumber to safely clear the obstruction.
Should I turn off the power to my electric water heater before draining?
Yes, absolutely. The upper and lower heating elements in an electric unit will burn out in seconds if they are exposed to air while energized. Always switch off the circuit breaker before draining any water.
Is it safe to flush an old water heater that has never been flushed?
Flushing a tank that is over 8–10 years old and has never been maintained carries a risk. Large sediment chunks can dislodge, revealing existing micro-corrosion leaks or clogging the drain valve permanently. Have a licensed plumber inspect old units before flushing.
Keep Your Hot Water Flowing with 24x7 American Plumber
Whether you need routine preventative maintenance, an annual tank flush, or emergency water heater repair, trust the certified experts at 24x7 American Plumber. We provide 24/7 service with upfront, transparent pricing and guaranteed workmanship across the USA.
-
Call Us 24/7:
762-383-0288 -
Visit Our Website:
24x7americanplumber.com -
Service Availability: Residential & Commercial Plumbing — 24 Hours a Day, 7 Days a Week